Social sharing has become one of the most powerful way to reach out to larger number of audience. Whenever we publish anything new it is always better to promote it on popular social networks to gain some immediate traffic. Integrating popular social sharing buttons on your site might drive more traffic if the reader likes your content and shares it.

One way of adding social share buttons is by adding JavaScript snippets provided by Facebook, LinkedIn, Twitter and Google+ or by using services like AddThis and ShareThis but it is not the optimal way of doing it, reasons for that are:

  1. Additional JavaScript will increase page size.
  2. Icons cannot be customized.
  3. More HTTP requests.

So what is the better way of doing this? All you need is a simple anchor (with URL?QueryString) and your own social sharing custom icons. You can also combine all those icons into single image this technique is called CSS Sprite. Using sprites will reduces number of HTTP request to the server and save bandwidth.

Facebook

<a href=https://facebook.com/sharer.php?u={URL} target="_blank">Facebook</a>

Linked In

<a href=http://www.linkedin.com/shareArticle?mini=true&url={URL}&title={Title} target="_blank">LinkedIn</a>

Twitter (Via and HashTags are optional)

<a href=https://twitter.com/intent/tweet?url={URL}&text={Title}&via={UserName}&hashtags={HashTags} target="_blank">Twitter</a>

Google Plus

<a href=https://plus.google.com/share?url={URL} target="_blank">Google+</a>

You can check out the sample for the same on CodePen here or check out the embedded pen below.

See the Pen jEzEGB by Arun Endapally (@arunendapally) on CodePen.

Now that we have seen how to add sharing with simple anchor, lets continue to make it look good by adding background image to the anchors.

You can download some free icons from here or here there are almost similar, I used the same in this blog or else if you have experience with photoshop you can also download icons.psd from here and customize them as required. To combine those individual icons into one image you can use this online sprite generator, combining into one image will reduce number of request to the server.

You can check out the sample for the same on CodePen here or check out the embedded pen below.

See the Pen WbzvXJ by Arun Endapally (@arunendapally) on CodePen.

We can also get the share count by sending request to the url which returns json and then we can retrieve the count from json, though it is possible avoid retrieving the count because by doing that will increase the requests and the time to your load the page will increase.

You can check out the sample for the same on CodePen here or check out the embedded pen below.

See the Pen LEdpNy by Arun Endapally (@arunendapally) on CodePen.

Note: I did not cover getting share count for google+ as it needs API_KEY and also for twitter to get the correct count you need to add the count for request with www and without www (Example: http://arunendapally.com and http://www.arunendapally.com will fetch different count).
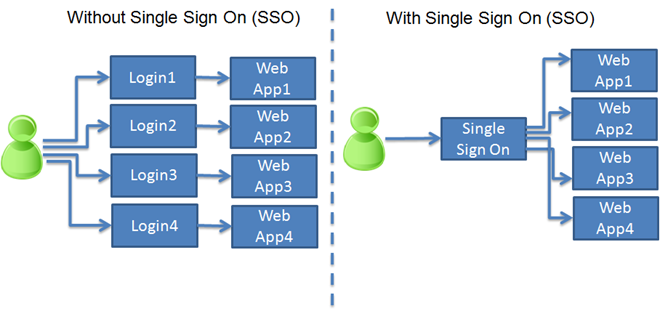
What is Single Sign On (SSO)?

To access any secured page in a web application, the user needs to authenticate and if the user want to access multiple web applications then the user have to login for each of those application individually. Logging in multiple times can be eliminated with Single Sign On i.e. user has to login only once and can access web multiple applications.

image

How to enable Single Sign On?

The key for enabling Single Sign On is machineKey and authentication (forms). All the Web Applications should have the same configuration to make it work.

    <machineKey validationKey="<MachineKey>" 
                decryptionKey="<DecryptionKey>" validation="<CryptoAlgorithm>" decryption="<CryptoAlgorithm>" />
    <authentication mode="Forms">
      <forms name="SingleSignOn" loginUrl="<SSOLoginURL>" timeout="480" slidingExpiration="true">
       </forms>
    </authentication>

How to implement Single Sign On in ASP.NET MVC?

Implementing SSO in ASP.NET MVC is very simple. Below is the step by step approach to implement it.

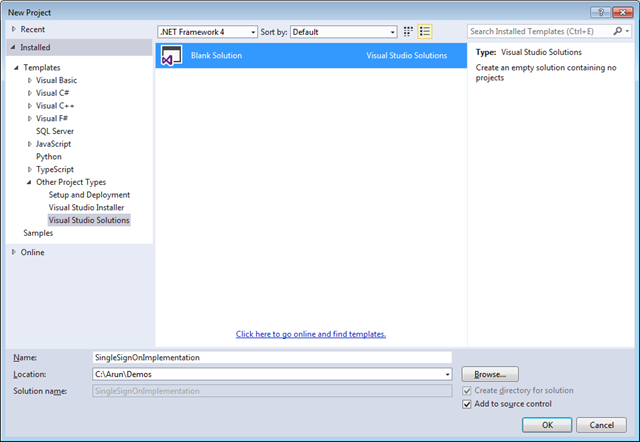
1. Open visual studio, create a blank solution (I always like to start off with a blank solution).

image

2. Now add three empty ASP.NET MVC Web Applications (SSO, WebApp1 & WebApp2) to the solution.

image

image

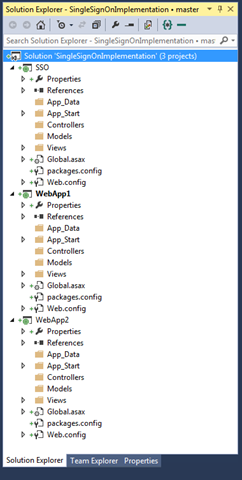
3. The solution should look something like below.

image

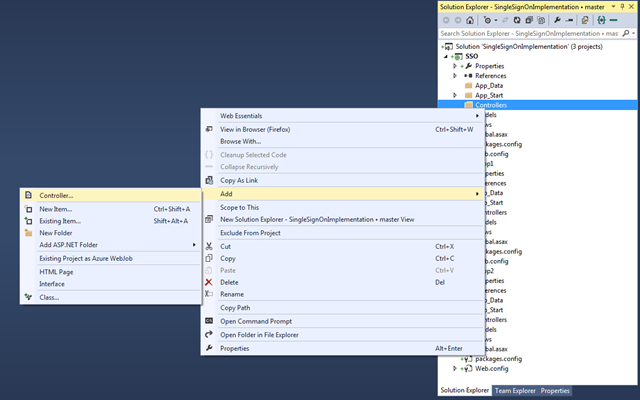
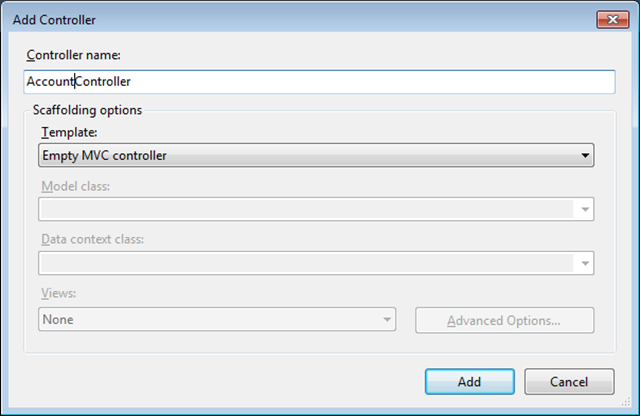
4. Add an AccountController in SSO, this should contain the code for login.

image

image

5. Write some simple forms authentication code like the below in the AccountController. For the demo purpose I am using FormsAuthentication.Authenticate method which will simple check the credentials stored in web.config and authenticates if username and the password are valid, you can also validate username and password stored in sql sever database.

using System.Web.Mvc;
using System.Web.Security;

namespace SSO.Controllers
{
  public class AccountController : Controller
  {
    [AllowAnonymous]
    public ActionResult Login(string returnUrl)
    {
      if (Request.IsAuthenticated)
      {
        return RedirectToAction("Index", "Home");
      }

      ViewBag.ReturnUrl = returnUrl;
      return View();
    }

    [AllowAnonymous]
    [HttpPost]
    [ValidateAntiForgeryToken]
    public ActionResult Login(string username, string password, string returnUrl)
    {
      if (FormsAuthentication.Authenticate(username, password))
      {
        FormsAuthentication.SetAuthCookie(username, false);
        if (!string.IsNullOrEmpty(returnUrl))
        {
          return Redirect(returnUrl);
        }
        else
        {
          return RedirectToAction("Index", "Home");
        }
      }
      else
      {
        ModelState.AddModelError(string.Empty, "Invalid login details");
        ViewBag.ReturnUrl = returnUrl;
        return View();
      }
    }
  }
}

6. Now we need to add a html form in the login view for the users to login.

@{
  ViewBag.Title = "Login";
}

<h2>Login</h2>
@using (Html.BeginForm(new { ReturnUrl = ViewBag.ReturnUrl }))
{
  @Html.ValidationSummary()
  @Html.AntiForgeryToken()
  <div class="form-group">
    @Html.Label("Username")
    @Html.Editor("UserName")
  </div>
  <div class="form-group">
    @Html.LabelForModel("Password")
    @Html.Password("Password")
  </div>
  <input class="btn btn-primary" type="submit" value="Login" />
}

7. Add machineKey to web.config of SSO, WebApp1 and WebApp2. You can create your own machine keys by following this or simple generate online from here. The machineKey should be added under system.web.

  <system.web>
    <machineKey validationKey="E4451576F51E0562D91A1748DF7AB3027FEF3C2CCAC46D756C833E1AF20C7BAEFFACF97C7081ADA4648918E0B56BF27D1699A6EB2D9B6967A562CAD14767F163"
                decryptionKey="6159C46C9E288028ED26F5A65CED7317A83CB3485DE8C592" validation="HMACSHA256" decryption="AES" />

8. Add forms authentication to web.config of SSO, WebApp1 and WebApp2. For WebApp1 and WebApp2 <credentials>…</credentials> is not required as we will authenticate users from only AccountController of SSO.

    <authentication mode="Forms">
      <forms name="SingleSignOn" loginUrl="http://localhost/SSO/Account/Login" timeout="480" slidingExpiration="true">
        <credentials passwordFormat="SHA1">
          <user name="demo" password="89e495e7941cf9e40e6980d14a16bf023ccd4c91"/> <!--password = demo-->
        </credentials>
      </forms>
    </authentication>

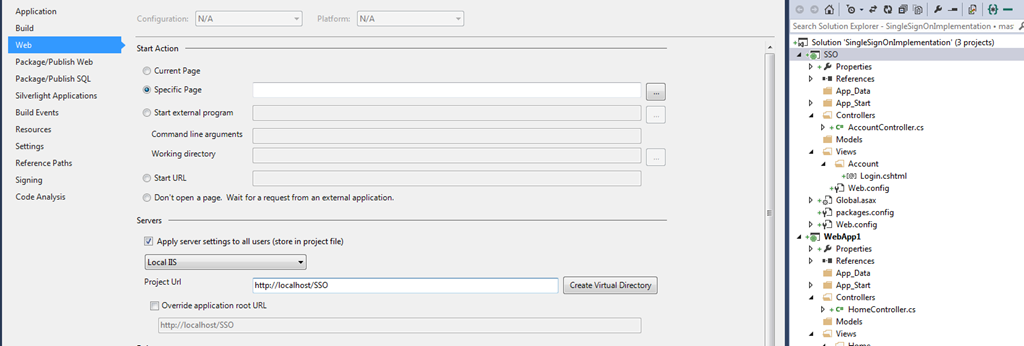
9. As you can see in the above I am using local IIS  localhost/SSOto configure it to run from there simple right click on project select the properties and select web like below.

image  

10. To test Single Sign On, add HomeController in both WebApp1 and WebApp2. Do not forget to add Authorize attribute on the HomeController, that will send the unauthenticated users to SSO Login.

  [Authorize]
public class HomeController : Controller
{
  //
  // GET: /Home/

  public ActionResult Index()
  {
    return View();
  }
}

11. Add Index view for the HomeController in both WebApp1 and WebApp2 respectively.

WebApp1/Home/Index.cshtml

@{
    ViewBag.Title = "Web App1 Home";
}

<h2>Web App1 Home</h2>

Logged in as @User.Identity.Name

WebApp2/Home/Index.cshtml

@{
  ViewBag.Title = "Web App2 Home";
}

<h2>Web App2 Home</h2>

Logged in as @User.Identity.Name

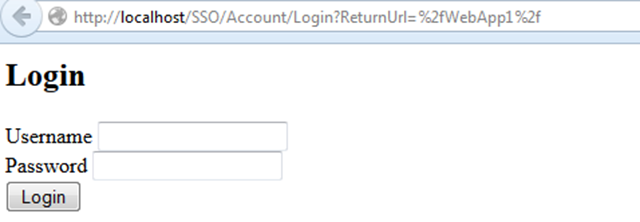
12. Now browse for http://localhost/WebApp1 it will automatically redirect to http://localhost/SSO/Account/Login?ReturnUrl=%2fWebApp1%2f

image

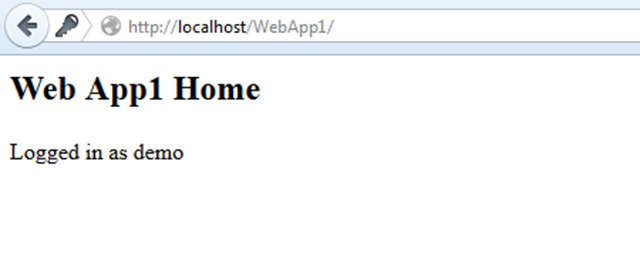
13. Login using Username and Password as demo. On logging in successfully it will automatically take you to http://localhost/WebApp1

image

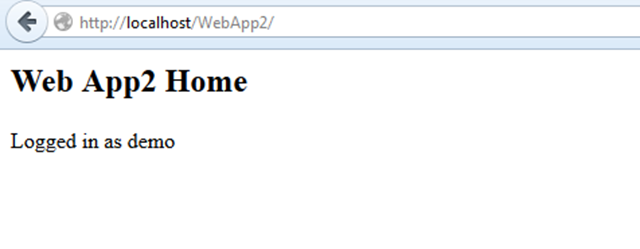
14. Now try to browse http://localhost/WebApp2/. You will see that it automatically login and it shows message as Logged in as demo.

image

You can get the source code for demo from GitHub https://github.com/arunendapally/SSO.